When viewers say a video “looks professional,” they’re usually reacting to three things: clarity, stability, and color. Clarity is the one people notice fastest—especially if your footage is old, low-resolution, or heavily compressed. That’s why upscaling has become a front-of-workflow step for many creators. Instead of waiting until the end to “see what happens,” you can restore detail early, then edit a cleaner, sharper image throughout the rest of your pipeline.
Modern AI tools make that possible without turning your edit into a technical science project. For example, UniFab Video Enhancer AI can upscale low-quality clips while also rebuilding detail and reducing noise. Putting an upscaling pass near the start gives you better material to color-correct, stabilize, and export later—so every improvement stacks instead of fighting a weak source.
Below is a practical, repeatable guide to raising video quality, starting with upscaling and then moving through shooting, editing, and export.
1. Upscale Early to Recover Clarity and Detail
If you’re working with footage that’s already shot—older archives, phone videos, screen recordings, or files downloaded from the internet—resolution is often the bottleneck. A clip can be well-lit and stable, but if it’s stuck at 720p (or worse), it won’t hold up on modern displays.
Why upscaling early helps
Traditional upscaling just stretches pixels. It can make the frame bigger, but not sharper. You get blur, edge halos, and that “digital fog” feeling.
AI upscaling works differently. It predicts missing detail based on learned patterns (faces, textures, edges), then reconstructs the image so it looks like it was captured at higher resolution in the first place. Running it early means:
- Editors see a cleaner timeline. You’re not color-grading noise or sharpening a soft image.
- Stabilization works better. Sharper edges give stabilizers more to track.
- Compression artifacts are reduced before export. Less junk in, less junk out.
Where UniFab fits naturally
The AI Video Upscaler by UniFab is built for this “clarity-first” approach. In typical workflows, creators use it to:
- upscale HD footage toward crisp 4K output
- restore detail lost to compression
- reduce low-light noise without smearing textures
- sharpen gently in a natural, non-plastic way
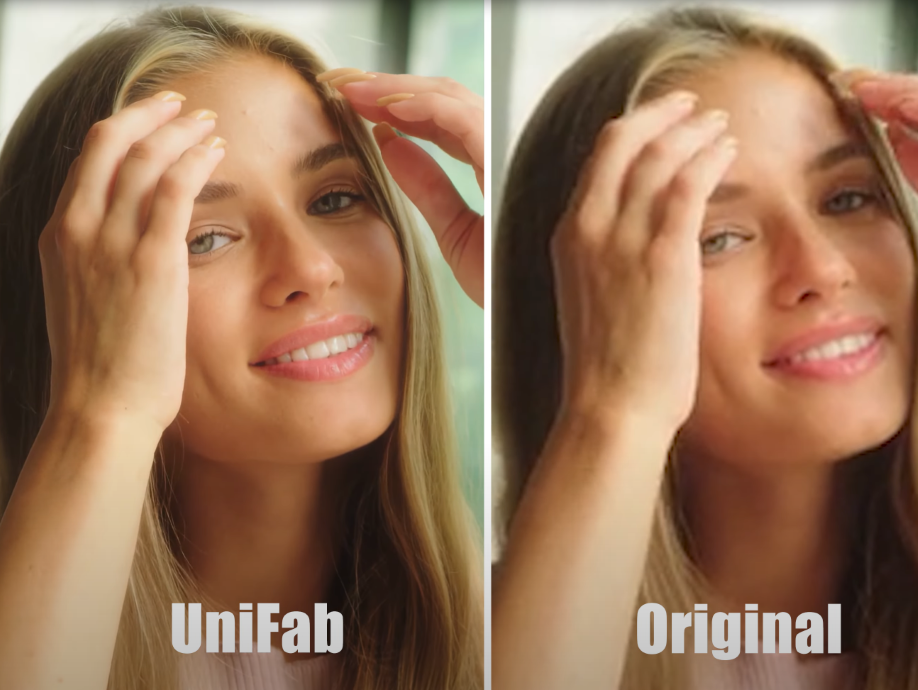
Instead of stacking separate denoise, sharpen, and upscale filters (then re-rendering repeatedly), UniFab handles these improvements in one consistent pass. You can then bring the enhanced clip into your editor and focus on story, pacing, and style.
2. Capture Better Footage When You Can
Upscaling helps the footage you already have. But if you’re filming new material, quality still starts at the source. Think of this as giving your future self a gift.
Resolution + bitrate
Resolution is pixel count; bitrate is how much information those pixels carry.
- Shoot at the highest resolution you can comfortably edit.
- If your camera allows bitrate choice, don’t pick the smallest file option.
- Avoid extreme in-camera compression for important shoots.
Frame rate
- 24–30 fps: natural motion for interviews, stories, marketing.
- 60 fps: action, sports, fast movement, gaming.
- Keep fps consistent unless you intend slow motion.
Focus discipline
Soft focus is hard to fix later, even with AI.
- Clean your lens.
- Lock focus for static scenes so the camera doesn’t “hunt.”
- Use manual focus if autofocus struggles in low light.
3. Lighting: The Upgrade That Beats Gear
People overbuy cameras and underuse light. But lighting is what makes any camera look good.
Simple rules:
- Light your subject from the front with something soft.
- Avoid harsh overhead bulbs that carve shadows into faces.
- Add a small side or back light for depth and separation.
Even a basic LED panel or ring light can reduce noise (because your camera doesn’t need to boost ISO) and make colors look cleaner.
4. Stabilization: Smoothness = Quality
Shaky video feels amateur fast. Stability is one of the easiest “quality multipliers.”
During filming
- Use a tripod whenever possible.
- If handheld, hold the camera close, elbows in, slow steps.
- A gimbal is worth it for walking or tracking shots.
In editing
Most editors include stabilization tools. Use them gently; too much can warp backgrounds. If that happens, lower the strength or accept a small crop.
5. Color Correction Before Color Style
Great color doesn’t mean dramatic filters. It means a clean base image first.
Color correction (technical)
- fix exposure
- correct white balance
- add contrast carefully
Clips that are too flat often just need controlled shadows and a mild contrast curve.
Color grading (creative)
Once corrected, you can choose a look:
- warm, natural, human
- cool, cinematic
- bright, high-contrast commercial
Grading also ensures consistency between shots recorded at different times or on different devices.
6. Reduce Noise the Right Way
Noise is common in low-light or older footage. It looks like grainy speckles and kills fine detail.
A safe method:
- Apply denoise lightly.
- Check skin and textured areas (hair, fabric, walls).
- Sharpen only after denoising.
If the footage is extremely noisy or compressed, AI enhancement tools (like UniFab’s denoise + detail restoration) are often more effective than traditional sliders.
7. Audio Quality Changes How the Video Feels
Even sharp, stable visuals can feel cheap if the audio is harsh or echoing. Viewers tolerate imperfect video faster than bad sound.
Quick improvements:
- remove hiss or hum with noise reduction
- normalize dialogue levels
- use gentle compression to control peaks
- re-record voiceover if possible in a quiet room
Clean audio makes your visuals look better by association.
8. Export Settings That Protect Your Work
You can do everything right and still ruin quality at export.
Key settings:
- Codec: H.264 for compatibility; H.265 for smaller files at similar quality.
- Bitrate: don’t starve your file.
- 1080p: ~10–20 Mbps
- 4K: ~35–60 Mbps
- 1080p: ~10–20 Mbps
- Two-pass encoding: slower, cleaner.
- Match timeline specs: export at the fps/resolution you edited unless there’s a reason to change.
Remember that platforms compress uploads. Deliver a high-quality master so their compression starts from a better place.
Conclusion
Better video quality isn’t one trick—it’s a sequence of smart steps. Starting with upscaling is the biggest mindset shift for creators dealing with legacy or imperfect footage. Enhance first, then edit. That way your stabilization, color work, and export are all building on a cleaner, sharper image.
With tools like UniFab Video Enhancer AI, upscaling and detail restoration no longer require a complicated stack of effects or hours of trial and error. You can revive old clips, modernize low-resolution footage, and create content that looks like it belongs on today’s screens.
Clarity pulls people in. Stability keeps them comfortable. Color makes them feel something. Nail those three—and your videos will look better than you thought possible, even before your audience knows why.